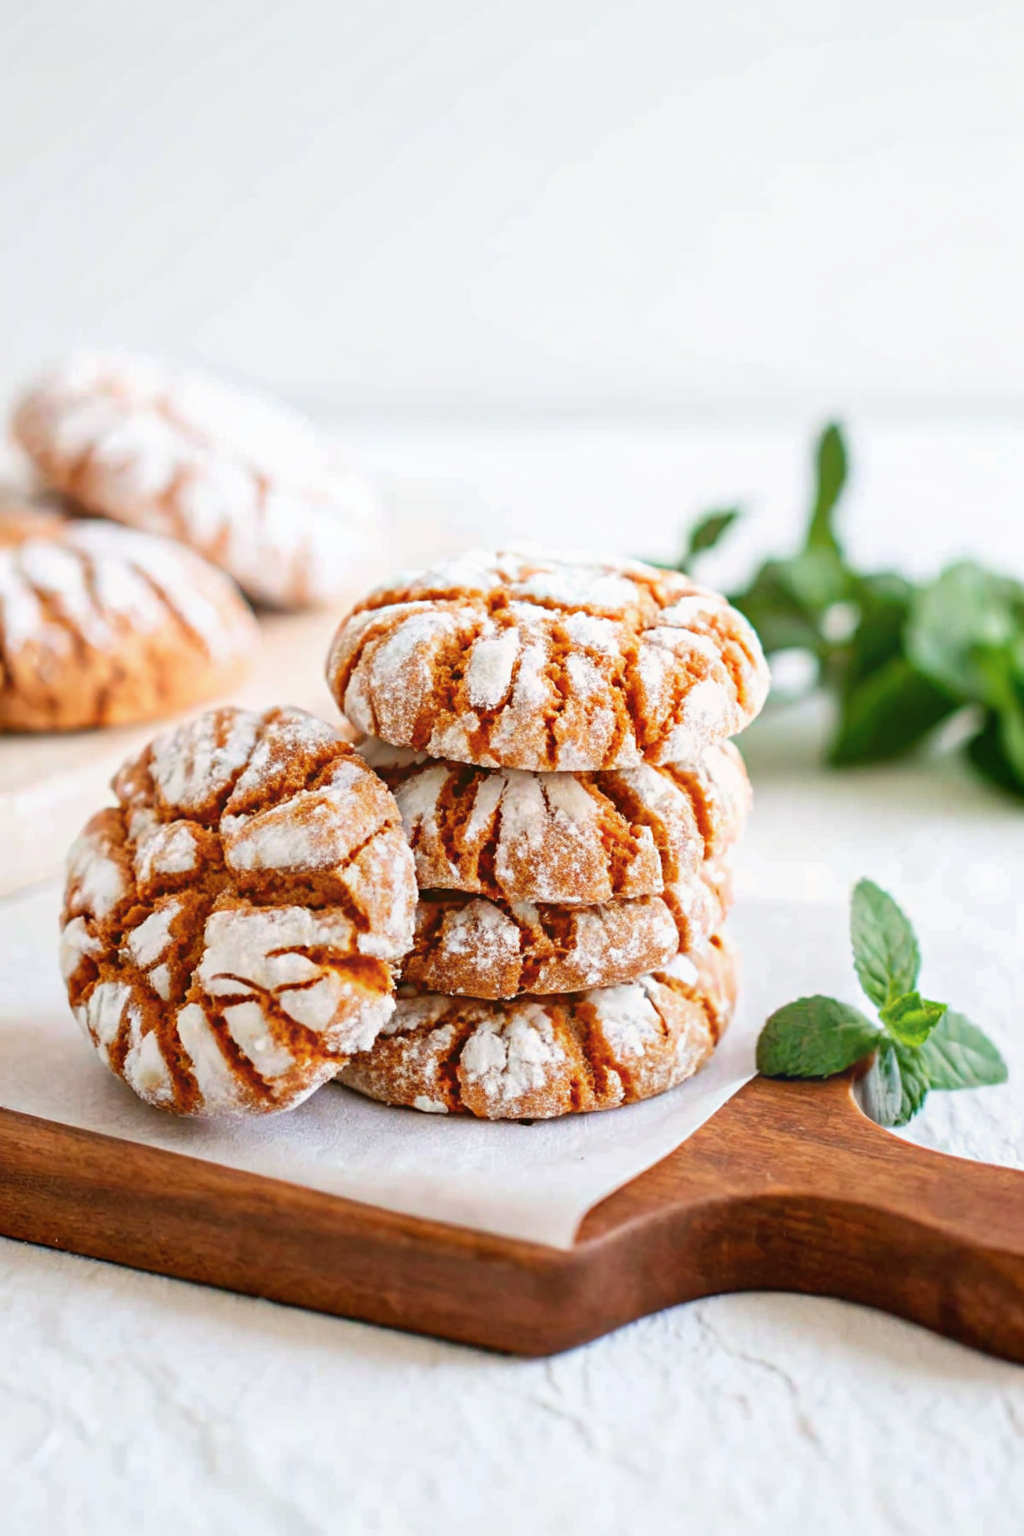
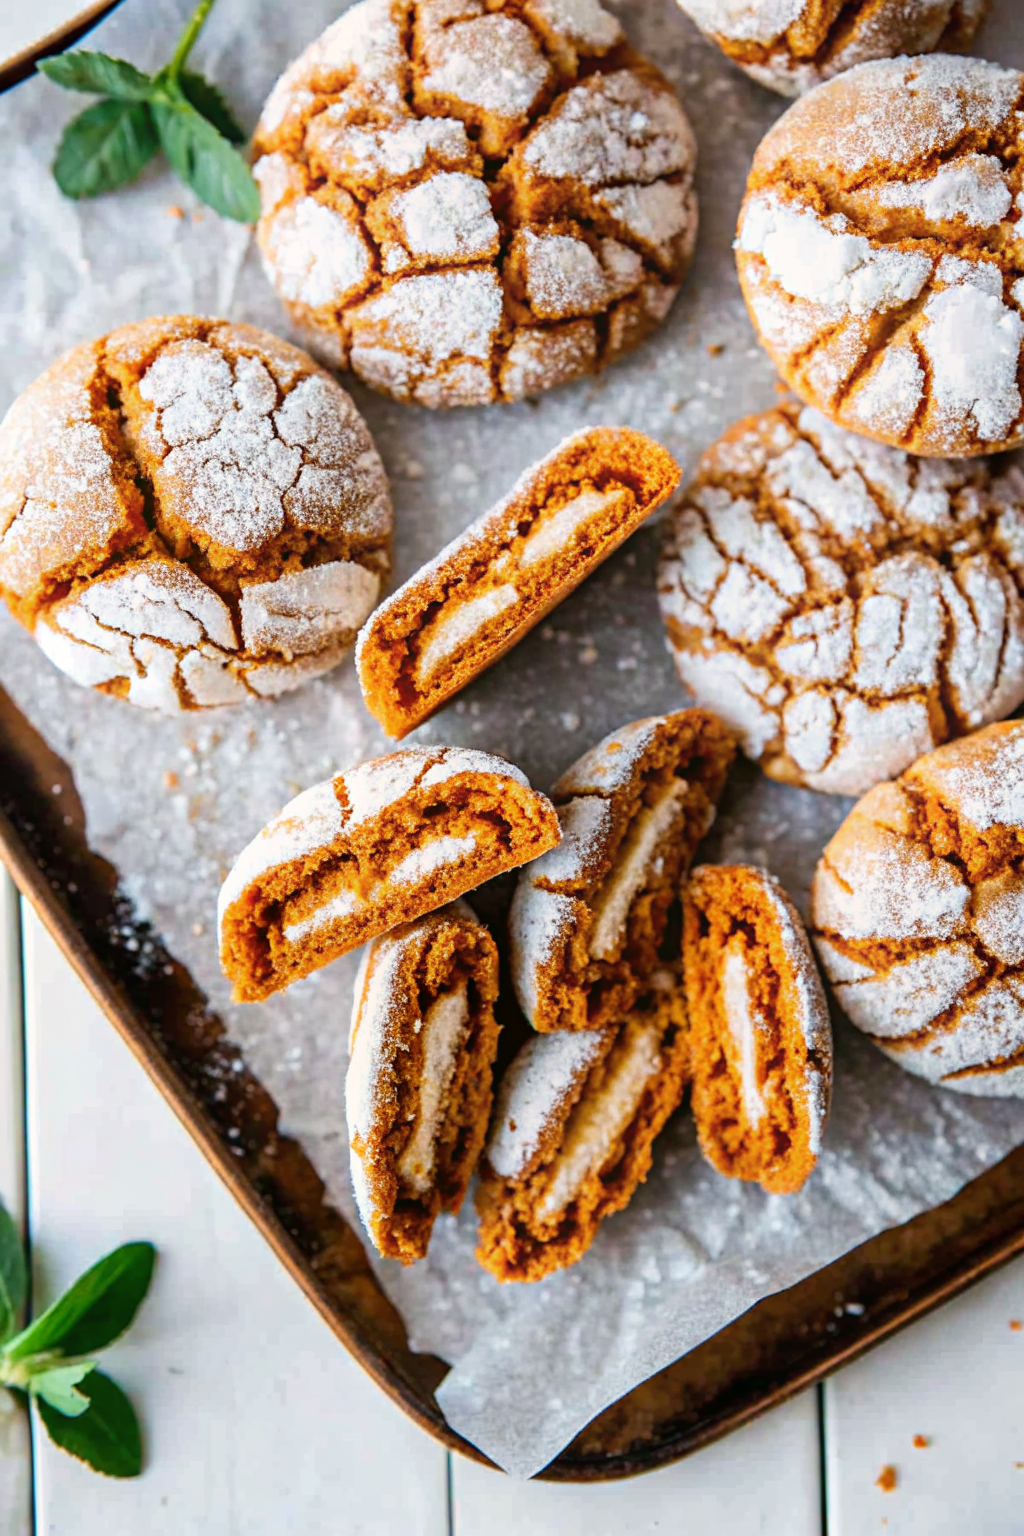
Picture this: a cookie that tastes just like your favorite creamy, spiced Thai iced tea, but with a soft, chewy, and delightfully crinkled texture. Now, hold onto your hats, because inside this amazing cookie, you’ll discover sweet and gooey little pockets of mochi! It’s a flavor explosion you won’t soon forget.
What Exactly is Thai Tea?
For those not in the know, Thai tea, often called “cha yen” stateside, is a beloved and seriously tasty drink hailing from Thailand. It’s got a flavor profile that’s totally its own, blending the robust taste of black tea with the rich creaminess of condensed milk. This tea is usually on the sweeter side and often has hints of yummy spices like star anise, tamarind, and a touch of cardamom. The result? A tea with a distinctive burnt orange hue and a flavor that’s creamy, sweet, and just a little bit spiced – kind of like a vacation in a glass!
Mochi Mania: What It Is and Why It’s So Good
Traditional mochi is a Japanese treat – a type of rice cake made from mochigome, which is a sweet and sticky short-grain rice. The traditional method involves soaking the rice, steaming it until it’s super soft, and then pounding it into a smooth, elastic dough. This dough is then shaped and often filled with something sweet, like a red bean paste.
Good news for the home baker! You can also make a slightly different version using glutinous rice flour. This stuff, often called mochiko, is a modern marvel that lets you skip the arm workout of pounding rice! To whip up mochi with it, just mix the glutinous rice flour with water and sugar, then give it a zap in the microwave until it turns into a sticky dough. Once it’s done, the mochi will have a smooth, bouncy texture and can be easily shaped. It’s a quick and easy way to enjoy this chewy Japanese delight right in your own kitchen.
Glutinous rice flour is a go-to for dessert recipes because it has a subtly sweet and almost milky flavor. Its unique composition also gives baked goods a wonderfully sticky and chewy texture. Bottom line: mochi’s fun, chewy sweetness makes it the perfect surprise filling for these incredible cookies!
Why These Cookies Will Rock Your World
- These Thai tea cookies are baked until they’re wonderfully soft with a satisfyingly chewy texture, thanks to that mochi hiding inside!
- Every single bite is packed with that unmistakable Thai tea flavor. It’s like your favorite drink in cookie form!
- Those gorgeous crinkles happen all on their own, giving you beautifully decorated cookies without any fancy piping or fuss!
- You can totally make the cookie dough ahead of time and then stuff them with mochi whenever you’re ready to bake. Talk about a make-ahead win!
Gear You’ll Need
- Spice grinder, food processor, or good old mortar and pestle: You’ll need one of these to grind your Thai tea leaves into a super fine powder. Get ready for some aromatic action!
- Spatula: This trusty tool will help you avoid overmixing your cookie dough, which is key to keeping them tender. More on that in the “Pro Tips” section!
- Kitchen scale: This is my secret weapon for measuring most of the ingredients in this recipe. It also helps you portion out the cookie dough evenly, so you get perfectly uniform cookies and no leftover dough dilemmas!
- Cookie scooper: If you don’t have a kitchen scale, no worries! A 2-tablespoon cookie scooper will also do the trick for measuring out your dough balls.
- Baking sheet: Obviously, you’ll need something to bake these beauties on! I highly recommend a good quality baking sheet that will give you evenly baked and easily removable cookies.
What You’ll Need
For the Mochi:
- 120 grams of glutinous rice flour (I swear by the Mochiko brand from Koda Farms. You can usually find it at your local Asian grocery store, but if not, the internet is your friend! Any brand of “sweet” or “glutinous” rice flour will work.)
- 35 grams of granulated sugar (the regular kind!)
- 250 grams of milk (any kind you like)
- 15 grams of coconut oil (or you can swap in some unsalted butter)
- Cornstarch, for dusting (this helps keep things from getting too sticky!)
For the Thai Tea Cookies:
- 2 ½ tablespoons of Thai tea mix, ground (I’ve had great success with the Pantai brand. Other brands like the ‘Number One’ brand taste similar but might give you a slightly different shade of orange. If you’re after that vibrant orange color, Pantai is your best bet. And make sure you’re using the loose leaf tea, not the instant stuff!)
- 35 grams of milk (again, any kind works!)
- 240 grams of all-purpose flour (the workhorse of the baking world)
- 1 ½ teaspoons of baking powder (for that perfect rise and crinkle)
- 1 teaspoon of kosher salt (I’m a fan of Diamond Crystal, but if you’re using regular table salt, cut the amount in half!)
- 90 grams of unsalted butter, melted (yep, melted! More on why later.)
- 160 grams of granulated sugar (for sweetness, of course!)
- 2 large eggs (make sure they’re at room temperature – or give them a quick warm bath if you forget!)
- 1 teaspoon of vanilla extract (for that extra touch of flavor)
- Granulated sugar and powdered sugar, for rolling (these are what give you that signature crinkle!)
Pro Tips for Cookie Perfection
- Dust that mochi! Sprinkle cornstarch generously over the mochi to prevent it from sticking to everything – your hands, the counter, other mochi pieces. This makes it way easier to handle. After you cut the mochi, dust each cut side with a little more cornstarch. A little goes a long way!
- Easy does it with the mixing. Don’t go overboard when mixing your cookie dough. Overmixing can lead to tough, dense cookies, and nobody wants that. When you add the flour, just mix until everything is barely combined.
- Weigh it out (if you can!). When it’s time to roll the cookie dough into balls, I highly recommend using a kitchen scale to make sure each one is the same weight. Since everyone’s dough will end up weighing slightly different amounts, weigh the whole batch first and then divide by 11 or 12 to get roughly 45-50 gram balls. This ensures even baking and no sad, tiny cookies!
- Chilling is crucial! Especially since we’re using melted butter, chilling the cookie dough before baking is non-negotiable. This helps the flour absorb the moisture and keeps the cookies thick with a soft and chewy center. Patience is a virtue here!
- Work quickly with the sugars. When you’re rolling the dough and coating it in sugar, try to be efficient so the dough doesn’t get too warm before baking. If it does get a little soft, just pop the uncoated dough balls back in the fridge for a few minutes to firm up.
- One sheet at a time, please! If you’re baking in batches, make sure the uncoated dough balls for the next batch stay chilled in the fridge. This prevents them from getting too warm. When you’re ready to bake, take them out, coat them quickly, and then into the oven they go!
- Don’t overbake! These cookies are best with soft, slightly underdone, and gooey centers. Keep a close eye on them and take them out when the edges are just starting to turn golden brown. They’ll continue to firm up as they cool on the baking sheet. Since every oven is a little different, I suggest baking 1-2 test cookies first to figure out the perfect baking time for your oven.
How to Keep Your Cookies Fresh
- Storing: The mochi in these cookies is a bit delicate and can get firm pretty quickly. It’s best to enjoy these cookies on the day they’re baked. However, if you store them in an airtight container at room temperature, they’ll still be tasty for up to 3 days. Just be aware that they might not look quite as perfect as they did fresh out of the oven!
- Freezing cookie dough: If you want to get ahead of the game, you can freeze the mochi-stuffed cookie dough balls before you coat them in sugar. They’ll keep in the freezer for up to 3 months. When you’re ready to bake, let the frozen dough thaw at room temperature for about 15-20 minutes before rolling them in the sugars and baking as usual. You might need to add a minute or two to the baking time.
- Freezing baked cookies: Already baked cookies can also be frozen for up to 1 month. Just thaw them at room temperature for a little while before serving.
Burning Questions Answered
- WHY IS MY MOCHI SO TOUGH? Overcooking is the main culprit here. If you microwave the mochi for too long, it’ll dry out and become hard and rubbery. Also, make sure you’re covering it with cornstarch or wrapping it, as this prevents it from drying out too quickly and becoming unpleasantly firm.
- WHY MELTED BUTTER FOR THE COOKIES? While some crinkle cookie recipes use oil, I’ve found that melted butter gives the best results for these particular cookies. It creates a richer, more fudgy center, which translates to chewier cookies with a wonderfully dense texture. Expect perfectly crisp edges and a soft, chewy inside!
- WHY THE DOUBLE SUGAR COAT? Rolling the cookie dough in granulated sugar first creates a base that encourages those beautiful cracks to form during baking. Then, the powdered sugar, applied afterward, helps create that signature crinkled texture by absorbing moisture and forming a delicate, sweet crust on the outside. It’s a winning combination for both looks and taste!
- WHY DID MY COOKIES SPREAD LIKE CRAZY? The most common reason for flat crinkle cookies is that the dough wasn’t chilled enough. Warmer dough tends to spread much faster in the oven. Also, be careful not to overmix the dough, especially after adding the flour. Mix just until everything is combined.
- WHY DIDN’T MY COOKIES SPREAD AT ALL? If your dough is too cold, the cookies might not spread enough. If you’ve chilled the dough overnight, let it sit at room temperature for about 15-20 minutes before rolling it in the sugars.
- WHERE ARE MY CRINKLES? Those signature cracks happen when the top of the cookie dries out before the inside sets, causing it to expand and crack. If your cookies aren’t crinkling, double-check that your oven is at the correct temperature (use an oven thermometer!) and that your baking powder isn’t expired.
Let’s Get Baking!
Description: These cookies capture the aromatic and creamy tastes of Thai tea in a soft and chewy, crinkled-textured delight. Now imagine biting into a warm and flavorful crinkle cookie, and finding sweet and gooey strands of mochi inside!
MOCHI
- 120 g glutinous rice flour
- 35 g granulated sugar
- 250 g milk
- 15 g coconut oil
- Cornstarch, for coating
THAI TEA COOKIES
- 2 ½ tbsp Thai tea, ground
- 35 g milk
- 240 g all-purpose flour
- 1 ½ tsp baking powder
- 1 tsp kosher salt
- 90 g unsalted butter, melted
- 160 g granulated sugar
- 2 eggs
- 1 tsp vanilla extract
- Granulated sugar for coating
- Powdered sugar for coating
Get Started (No Screen Dimming Here!)
MOCHI
- In a microwave-safe bowl, whisk together the glutinous rice flour, granulated sugar, and milk. Cover the bowl tightly with plastic wrap and microwave on high for 1 minute.
- Carefully remove the bowl from the microwave and give the mochi mixture a quick stir to distribute any liquid. Cover again and microwave for another 1 minute.
- Remove the bowl from the microwave and add the coconut oil to the hot mochi. Stir until it’s fully incorporated. Cover the bowl again and set it aside to cool for at least 10 minutes.
- Lightly dust a clean surface with cornstarch. Turn the cooled mochi dough out onto the surface and gently knead and stretch it until it’s smooth. Divide the dough into 12 equal portions. Coat each piece lightly with cornstarch and set them aside.
THAI TEA COOKIES
- Grind the loose leaf Thai tea into a fine powder using a spice grinder, food processor, or a mortar and pestle. For the smoothest result, pass the powder through a fine-mesh sieve to remove any larger particles. You should have exactly 2 ½ tablespoons of ground Thai tea!
- In a small bowl, combine the sifted Thai tea powder with the milk and whisk until well combined. Let this mixture sit for at least 5 minutes to allow the tea to infuse.
- In a medium-sized bowl, whisk together the all-purpose flour, baking powder, and kosher salt. Set this dry mixture aside.
- In a large bowl, whisk together the melted unsalted butter and granulated sugar until well combined. Then, add in the eggs, vanilla extract, and the Thai tea mixture. Continue whisking until everything is thoroughly incorporated.
- Gently fold the dry flour mixture into the wet ingredients, mixing just until everything is combined. Be careful not to overmix. Cover the bowl with plastic wrap and chill the dough in the refrigerator for at least 2 hours, or preferably overnight.
- When you’re ready to bake, preheat your oven to 350°F (180°C). Line a baking sheet with parchment paper for easy cleanup.
- Pour the granulated sugar into one small bowl and the powdered sugar into another. Set these aside for coating the cookies.
- Each portion of cookie dough should yield approximately 12 equal-sized balls, each weighing around 45-50 grams (or about 2 tablespoons). Take one ball of dough and flatten it slightly in your palm. Place one piece of mochi in the center, then carefully bring the edges of the cookie dough together to completely enclose the mochi, forming it back into a smooth ball¹.
- Roll each stuffed cookie dough ball first in the bowl of granulated sugar, then roll it in the bowl of powdered sugar until it’s completely coated. Arrange the sugared dough balls on the prepared baking sheet, spacing them about 1 to 1.5 inches apart. If your baking sheet isn’t big enough for all the cookies, keep the remaining uncoated dough balls chilled in the fridge until you’re ready for the next batch.
- Bake for 12 to 15 minutes, or until the tops of the cookies crack and the bottom edges just start to turn a light golden brown. Once they’re out of the oven, let the cookies cool on the baking sheet for about 2 minutes before carefully transferring them to a wire rack to cool completely.
Important Notes
¹ Cookie dough can warm up quickly! If you notice the dough becoming too soft or sticky while you’re working with it, simply place the uncoated dough balls back in the refrigerator for at least 15-30 minutes to firm up before continuing with the sugar coating.